在前面,我们安装了thinkphp之后,那么如何用thinkphp开发项目呢?
1、 打开application/index/controller/Index.php,我们可以看到有如下代码。
<?php Namespace appindexcontroller; class Index { public function index() { return '<style type="text/css">*{ padding: 0; margin: 0; } div{ padding: 4px 48px;} a{color:#2E5CD5;cursor: pointer;text-decoration: none} a:hover{text-decoration:underline; } body{ background: #fff; font-family: "Century Gothic","Microsoft yahei"; color: #333;font-size:18px;} h1{ font-size: 100px; font-weight: normal; margin-bottom: 12px; } p{ line-height: 1.6em; font-size: 42px }<div> <h1>:) </h1> <p> thinkphp V5.1<br><span>12载初心不改(2006-2018) - 你值得信赖的PHP框架</span></p> </div><script></script><script></script><think></think>'; } public function hello($name = 'ThinkPHP5') { return 'hello,' . $name; } }
在上述代码中,
(1)、namespace appindexcontroller 是命名空间。PHP中命名空间使用关键字namespace定义,其基本语法格式是:
立即学习“PHP免费学习笔记(深入)”;
namespace 空间名称;
其中空间名称遵循基本标识符命名规则,以数字、字母和下划线构成,且不能以数字开头)。关于更多的命名空间,大家可以自行上网搜索。
(2)、class Index 是一个类,类中有index()和hello()方法,比如index()方法中的return返回的就是我们项目首页的html内容。
(3)、访问index()方法,直接通过http://localhost:8010/tp5.1.36/public这个URL进行访问(localhost表示的是本地主机,8010是apache服务器的端口号,tp5.1.36是项目名)。
(4)、如果要访问hello()方法,那么就需要通过http://localhost:8010/tp5.1.36/public/index.php/index/index/hello这个URL来访问,打开后,网页中显示“hello,ThinkPHP5”.
ThinkPHP5.1完全开放手册是这样描述的:http://serverName/index.php(或者其它应用入口文件)/模块/控制器/操作/[参数名/参数值…]
那么我们来看这个地址
http://localhost:8010/tp5.1.36/public/index.php/index/index/hello
其中:
index.php后面的第一个index表示的是模块;
index.php后面的第二个index表示的是控制器;
hello表示的是index模块下的index控制器下的hello()方法。
(5)、可以通过URL重写隐藏应用的入口文件index.php(也可以是其它的入口文件,但URL重写通常只能设置一个入口文件),下面是相关服务器的配置参考(以apache为例):
1) httpd.conf配置文件中加载了mod_rewrite.so模块
2) AllowOverride None 将None改为 All
3) 把下面的内容保存为.htaccess文件放到应用入口文件的同级目录下
<ifmodule> Options +FollowSymlinks -Multiviews RewriteEngine On RewriteCond %{REQUEST_FILENAME} !-d RewriteCond %{REQUEST_FILENAME} !-f RewriteRule ^(.*)$ index.php/$1 [QSA,PT,L] </ifmodule>
2、 打开mysql服务器,创建数据库,将数据库名称命名为student。
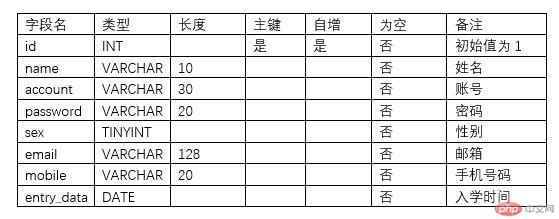
3、 在该数据库下创建一张表,表名为:student。

4、 向student表中插入如下数据

上面性别的取值中,1表示的是男,2表示的是女。
5、 编辑config/database.php文件,参考如下代码修改数据库的配置。
// 数据库类型 'type' => 'mysql', // 服务器地址 'hostname' => '127.0.0.1', // 数据库名 'database' => 'student', // 用户名 'username' => 'root', // 密码 'password' => 'root',
请根据自己的实际情况进行修改,我这里的用户名和密码都是root。
6、 在Index控制器下添加student()方法,将student表查询出来,具体代码如下。
public function index() { $data=thinkDb::name(‘select * from `student`’); $arr=[]; foreach($data as $v){ $arr[]=$v[‘name’]; } return implode(‘,’,$arr); }
通过访问localhost:8010/tp5.1.36/public/index.php/index/index/student进行测试,可以看到浏览器中显示的数据为:李四,张三,王五。
7、 在实际开发中,我们会遇到各种错误,为了更好的调试错误,ThinkPHP提供了非常强大的错误报告和跟踪调试功能。打开config/app.php文件,找到如下两行代码,将值改为true。
‘app_debug’ =>’true’,//应用调试模式 ‘app_trace’ =>’true’,//应用trace
8、 在实际开发中,需要编写大量的HTML网页,为了方便编写HTML网页,我们可以单独将HTML放置在一个模板文件中。为了实现这个效果,需要让控制器中的Index类继承thinkController类,代码如下所示。
class Index extends thinkController
9、 继承thinkController类后,就可以使用这个类提供的assgin()和fetch()方法。
10、 接下来修改student()方法中的代码内容,调用assgin()方法为模板赋值,再调用fetch()方法喧嚷模板,具体代码如下。
public function index() { $data=thinkDb: name(‘student`’)->filed(‘name’)->select(); $this->assgin(‘data’,$data); return $this->fetch(); }
通过访问localhost:8010/tp5.1.36/public/index.php/index/index/student进行测试,会出现报错,是因为我们还没有创建该模板,根据提示可以找到该路径位于application/index/view/Index/student.html。手动创建模板文件和其所在的目录,编写代码如下:
nbsp;html> <meta> <meta> <meta> <title>学生信息列表</title> { foreach($data as $v)} <div>{$v.name]}></div> {/foreach;}
11、这样就可以在模板文件中输出所有学生的姓名。
TP5.1的第一个项目就这样完成了,在后续的文章中,我们再进行细讲涉及到的知识点。


