官方提供的项目生成工具vue-cli没有对多页面webapp的支持,但是在实际的项目中,我们需要这样的脚手架,参考了很多大牛的方法,本文提供了一种我的单页面脚手架转换为多页面脚手架的方案,供大家参考。不好的地方也请大家指正。
准备
使用vue-cli生成一个你需要的单页面项目脚手架,然后我们就要开始我们的改装工程了。
重构过程
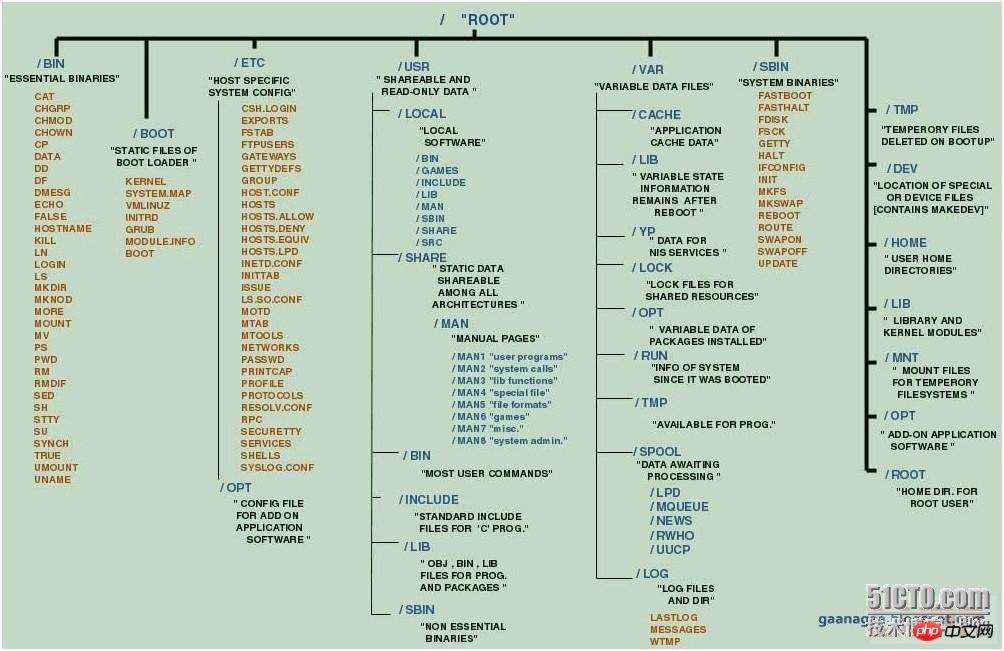
步骤一 改变目录结构
立即学习“前端免费学习笔记(深入)”;
-
step1 在src目录下面新建views文件夹,然后再views文件夹下新建index文件夹
-
step2 将src目录下的main.JS和App.vue移动到step1中的index文件夹下,并将main.js重命名为index.js
-
step3 将src目录下的router文件夹移动到step1中的index文件夹下,如果不使用router可以再index.js中注释掉,我没有使用,因为我的每个页面不是单页面的应用,不必要使用路由功能
-
step4 将根目录下的index.html文件移动到step1中的index文件夹下
步骤二 修改build下的配置文件
在生产环境下会分页面打包独有js文件,并抽取公共js,不会什么都打包成一坨。打包后文件目录结构也是比较清晰地。一下所有修改都在build文件夹下
step1 修改utils.js,增加两个函数,一个用来获取页面多入口,一个用来输入打包后的页面,并注入js:
var glob = require('glob') var HtmlwebpackPlugin = require('html-webpack-plugin') var PAGE_PATH = path.resolve(__dirname, '../src/views') var merge = require('webpack-merge') //多入口配置 //获取views文件夹下,每个页面下的index.js作为页面入口,故每个页面下都必须有index.js exports.entries = function() { var entryFiles = glob.sync(PAGE_PATH + '/*/index.js') var map = {}, tmp = [], pathname = ''; entryFiles.forEach((filePath) => { var filename = filePath.substring(filePath.lastIndexOf('/') + 1, filePath.lastIndexOf('.')) tmp = filePath.split('/').splice(-4) map[tmp[2] + '/' + filename] = filePath }) return map } //多页面输出配置 //读取views文件夹下的对应每个页面的html后缀文件,然后放入数组中 //如果想要更深的定制或者修改,建议大家看一下CommonsChunkPlugin //推荐一个基础的 https://segmentfault.com/q/1010000009070061 exports.htmlPlugin = function() { let entryHtml = glob.sync(PAGE_PATH + '/*/*.html') let arr = [] entryHtml.forEach((filePath) => { let jsPath = '', tmp = []; let filename = filePath.substring(filePath.lastIndexOf('/') + 1, filePath.lastIndexOf('.')) tmp = filePath.split('/').splice(-4) jsPath = tmp[2] + '/' + 'index' let conf = { template: filePath, filename: filename + '.html', chunks: ['manifest', 'vendors', jsPath], inject: true } if (process.env.NODE_ENV === 'production') { conf = merge(conf, { minify: { removeComments: true, collapseWhitespace: true, removeAttributeQuotes: true }, chunksSortMode: 'dependency' }) } arr.push(new HtmlWebpackPlugin(conf)) }) return arr } step2 修改webpack.base.conf.js文件配置的入口 // entry: { // app: './src/main.js' // }, entry: utils.entries(), step3 修改webpack.dev.conf.js文件的打包方法 找到下面的代码,将其注释掉: new HtmlWebpackPlugin({ filename: 'index.html', template: 'index.html', inject: true }),
在plugins这个属性值的后面加上我们上面的方法,下面是代码片段:
// new HtmlWebpackPlugin({ // filename: 'index.html', // template: 'index.html', // inject: true // }), new FriendlyErrorsPlugin() ].concat(utils.htmlPlugin()) step4 修改webpack.prod.conf.js 找到下面的代码,注释掉: new HtmlWebpackPlugin({ filename: config.build.index, template: 'index.html', inject: true, minify: { removeComments: true, collapseWhitespace: true, removeAttributeQuotes: true // more options: // https://github.com/kangax/html-minifier#options-quick-reference }, // necessary to consistently work with multiple chunks via CommonsChunkPlugin chunksSortMode: 'dependency' }),
在plugins这个属性值的后面加上我们上面的方法,下面是代码片段:
new CopyWebpackPlugin([{ from: path.resolve(__dirname, '../static'), to: config.build.assetsSubDirectory, ignore: ['.*'] }]) ].concat(utils.htmlPlugin())
配置完成。正常启动项目即可。
相关推荐:
如何将 Vue-cli 改造成支持多页面的history模式
© 版权声明
文章版权归作者所有,未经允许请勿转载。
THE END